100일 챌린지/빅데이터기반 인공지능 융합 서비스 개발자
Day 46 - Spring ver 3. 프로젝트 만들기
ksyke
2024. 9. 30. 12:41
기본세팅
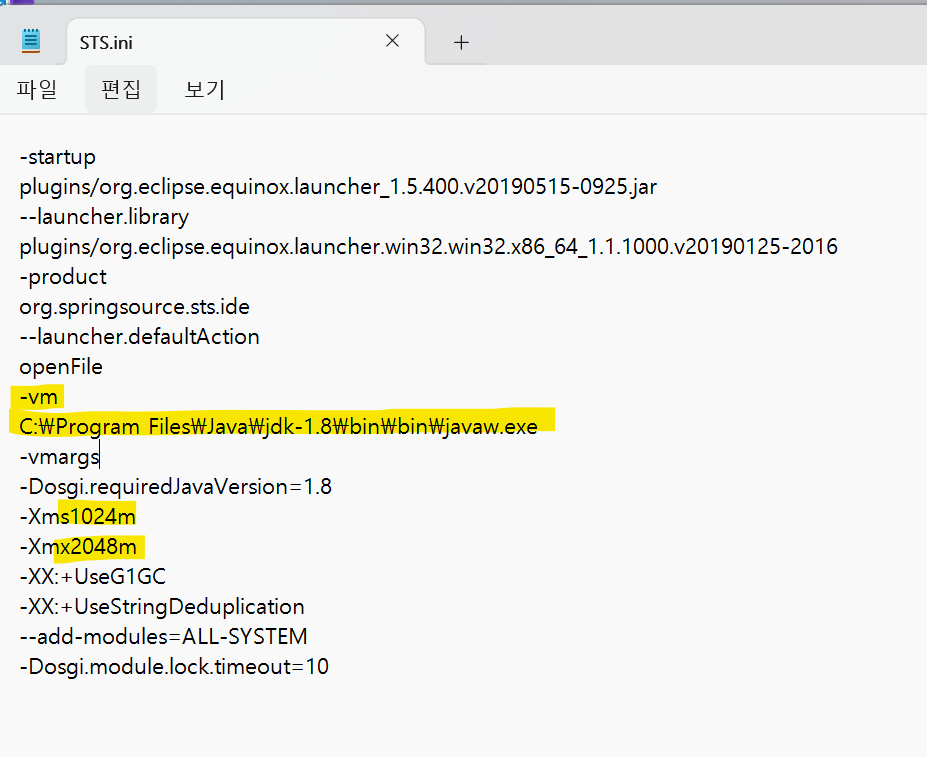
STS.ini

Template 정하기


default 외의 템플릿을 다 지운 다음에 eclipse를 종료한다.
위의 파일을 다음의 경로에 저장한다.
[[workspace]]\.metadata\.plugins\org.springsource.ide.eclipse.commons.content.core
이후 eclipse를 실행한다.

위와 같이 legacy project 템플릿 란에 목록이 생긴다.


Spring 3 문법

controller에서 메세지 출력하기


url 매핑하기


혹은


위와 같이 controller를 상속받지 않고 사용할 수 있다.
POJO(Plain Old Java Project)
- 오래된 방식의 간단한 자바 오브젝트라는 말로서 Java EE 등의 중량 프레임워크들을 사용하게 되면서 해당 프레임워크에 종속된 "무거운" 객체를 만들게 된 것에 반발해서 사용되게 된 용어.
- 하나 이상의 메소드가 사용될 수 있다.
@Controller
public class Ex04Controller {

	@RequestMapping("/ex04.do")
	public String ex04page() {
		return "ex04";
	}

	@RequestMapping("/ex05.do")
	public String ex05page(HttpServletRequest req) {
		req.setAttribute("msg", "ex05 page");
		return "ex05";
	}

	@RequestMapping("/test/ex06.do")
	public void ex06() {
	}

	@RequestMapping("/ex07.do")
	public View ex07() {
		return new View() {

			@Override
			public String getContentType() {
				return "text/html; charset=UTF-8";
			}

			@Override
			public void render(Map<String, ?> model, HttpServletRequest request, HttpServletResponse response)
					throws Exception {
				PrintWriter out=null;
				try{
					out=response.getWriter();
					out.print("<h1>ex07 page</h1>");
				}finally {
					if(out!=null)out.close();
				}

			}
		};
	}

	@RequestMapping("/test/ex08.do")
	public ModelAndView ex08() {return null;}

	@RequestMapping("/test/ex09.do")
	public String ex09(HttpServletRequest req) {
		req.setAttribute("msg", "ex09 page");
		return "ex01";
	}

	@RequestMapping("/test/ex10.do")
	public String ex10(Model model) {
		model.addAttribute("msg", "ex10 page");
		return "ex01";
	}

	@RequestMapping("/test/ex11.do")
	public void ex11(HttpServletResponse res) throws IOException {
		PrintWriter out=null;
		try {
			out=res.getWriter();
			out.print("<h1>ex11 page</h1>");
		}finally {
			if(out!=null)out.close();
		}
	}
}
하나의 Controller로 여러개의 페이지 정의하기
@Controller
public class Ex12Controller {

	@RequestMapping(value="/ex12.do",method=RequestMethod.GET)
	public String ex12() {return "ex02";}

	@RequestMapping(value="/ex12.do",method=RequestMethod.POST)
	public String ex13(HttpServletRequest req) {
		String id=req.getParameter("id");
		String pw=req.getParameter("pw");
		req.setAttribute("id", id);
		req.setAttribute("pw", pw);
		return "ex03";
	}

	@RequestMapping(value="/ex13.do")
	public String ex13(Model model,@RequestParam("id") String id,String pw) {
		model.addAttribute("id", id);
		model.addAttribute("pw", pw+1);
		return "ex03";
		}
}
<body>
<h1>ex02 controller</h1>
<form action="ex13.do" method="post">
id<input type="text" name="id"/>
pw<input type="text" name="pw""/>
<button>전송</button>
</form>
</body><body>
<h1>ex03 controller</h1>
<p>id: ${id }</p>
<p>pw: ${pw }</p>
</body>Model 활용하기
@Controller
public class Ex13Controller {

	@RequestMapping("/ex14.do")
	public String ex14() {return "ex04";}

	@RequestMapping("/ex15.do")
	public String ex15(@ModelAttribute("bean") EmpVo bean) {
		bean.setEmpno(3333);
		bean.setPay(4444);
		bean.setEname("test");
		bean.setHiredate(LocalDate.now(ZoneId.systemDefault()));
		return "ex05";
	}
}
Controller에 requestMapping url을 넣어 depth 활용하기
@Controller
@RequestMapping("/dept2")
public class Ex16Controller {

	@RequestMapping("/ex16.do")
	public String ex16() {return "ex02";}
	@RequestMapping("/ex17.do")
	public String ex17() {return "ex04";}
	@RequestMapping("/ex18.do")
	public String ex18() {return "test/ex06";}
}
주소경로에서 값을 받아오기
@Controller
public class Ex19Controller {

	@RequestMapping("/{msg}/{msg2}.do")
	public String ex19(Model model,
			@PathVariable("msg")String msg,
			@PathVariable("msg2")String msg2
			) {
		model.addAttribute("msg",msg);
		model.addAttribute("msg2",msg2);
		return "ex01";
	}
}
context package외의 패키지에서의 controller 사용하기
servlet-context.xml
	<!-- DispatcherServlet Context: defines this servlet's request-processing infrastructure -->
	<beans:bean class="com.gimhae.Ex20Controller"></beans:bean>
혹은 아래의 주소를 상위 패키지로 바꾼다.
<context:component-scan base-package="com.gimhae" />dispatcher servlet에서 제외시키기
servlet-context.xml


	<!-- Handles HTTP GET requests for /resources/** by efficiently serving up static resources in the ${webappRoot}/resources directory -->
	<!-- <resources mapping="/resources/**" location="/resources/" /> -->
	<resources location="/resources/imgs/" mapping="/imgs/**"/>
	<resources location="/resources/css/" mapping="/css/**"/>
	<resources location="/resources/js/" mapping="/js/**"/>
	<resources location="/resources/font/" mapping="/font/**"/>
템플릿 라이브러리 버전업 하기
pom.xml
java


servlet

jsp

junit

web.xml
-server web.xml에서 web-app가져오기

.settings
